Juniper - Day One: This Week - Deploying MPLS Introduction
I have been following the aforementioned Day One Book and have been documenting terse instructions to remind my “future” self of bare minimums needed for various networking config. There are a lot of configuration directives missing from the Day One book as a high level of knowledge is assumed so this post and associated files is sort of a fully configured Jump Start.
First off, if you do not already have a copy, I highly recommend it as a learning guide. It is “full on” but worth it. The author has done a great job with the mountain of work he has had to present. So get it here.
So, when you make it through Chapter 1 following the examples and configurations in a lab environment, and then have had a read through Chapter 2, well then might find these pages of some interest. If you have not, then all of this is probably not going make any sense at all.
To get started I have uploaded all the router configs here, named as hostname-initial.cfg and these are configs for Junos 12.1R1.9. ssh is enabled and the password is networkfoo1. You will also find the network topology diagram there in .odg format.
Initial Configuration & Verification
Once all 5 “Provider Core” and 4 “Provider Edge” routers from AS65431 and the “Customer Edge” router are loaded, your network should look like the following:
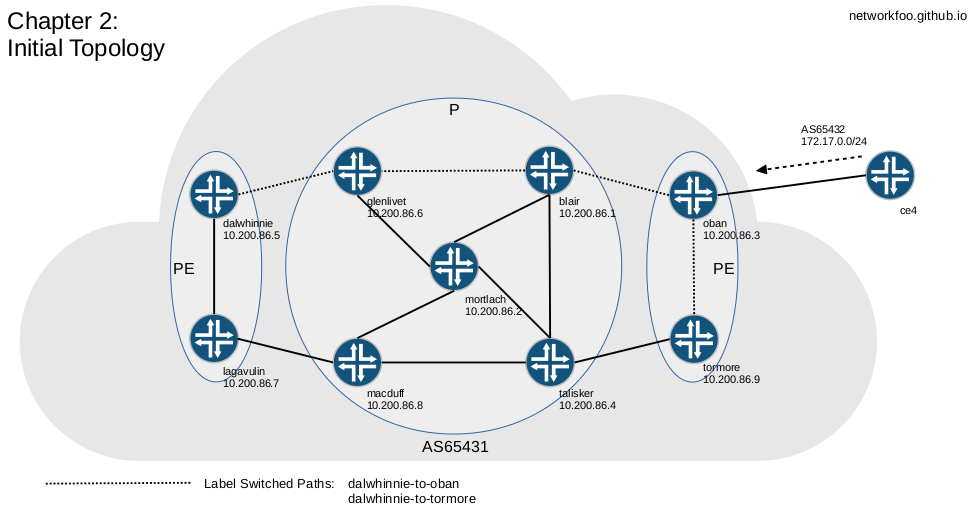
Now we can confrim the RSVP Label Switched Paths:
networkfoo@dalwhinnie> show mpls lsp name dalwhinnie-to-oban
Ingress LSP: 2 sessions
To              From            State Rt P     ActivePath       LSPname
10.200.86.3     10.200.86.5     Up     0 *                      dalwhinnie-to-oban
Total 1 displayed, Up 1, Down 0

Egress LSP: 0 sessions
Total 0 displayed, Up 0, Down 0

Transit LSP: 0 sessions
Total 0 displayed, Up 0, Down 0

networkfoo@dalwhinnie> show mpls lsp name dalwhinnie-to-tormore
Ingress LSP: 2 sessions
To              From            State Rt P     ActivePath       LSPname
10.200.86.9     10.200.86.5     Up     0 *                      dalwhinnie-to-tormore
Total 1 displayed, Up 1, Down 0

Egress LSP: 0 sessions
Total 0 displayed, Up 0, Down 0

Transit LSP: 0 sessions
Total 0 displayed, Up 0, Down 0
However, these will not be operational as there is a bit of a void between oban and ce4, however to run a quick test we can remedy this with:
networkfoo@dalwhinnie# set protocols mpls label-switched-path dalwhinnie-to-oban install 192.168.90.12/30
See page 40-41 for more information in regards install 192.168.90.12/30.
First, you will see that the route has now become available:
networkfoo@dalwhinnie> show route 172.17.0.0/24 all

inet.0: 29 destinations, 29 routes (29 active, 0 holddown, 0 hidden)
+ = Active Route, - = Last Active, * = Both

172.17.0.0/24      *[BGP/170] 00:43:02, localpref 100, from 10.200.86.3
                      AS path: 65432 I
                    > to 192.168.86.5 via em1.0, label-switched-path dalwhinnie-to-oban
and check a traceroute, you shold see it being routed via MPLS
networkfoo@dalwhinnie> traceroute 172.17.0.1

traceroute to 172.17.0.1 (172.17.0.1), 30 hops max, 40 byte packets
 1  192.168.86.5 (192.168.86.5)  0.255 ms  0.201 ms  0.682 ms
     MPLS Label=300288 CoS=0 TTL=1 S=1
 2  192.168.86.9 (192.168.86.9)  0.509 ms  0.359 ms  0.486 ms
     MPLS Label=300368 CoS=0 TTL=1 S=1
 3  192.168.86.25 (192.168.86.25)  0.984 ms  0.562 ms  0.614 ms
 4  172.17.0.1 (172.17.0.1)  0.850 ms  0.648 ms  0.673 ms
Delete the installed route now before we move on:
networkfoo@dalwhinnie# delete protocols mpls label-switched-path dalwhinnie-to-oban install 192.168.90.12/30
Conclusion
OK, now that is all confirmed working, that is the end of Part 1. It leaves us ready to configure our BGP Level 3 VPN’s in Part 2.